
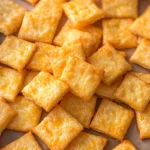
Homemade Cheeze-Its are a delightful twist on the classic snack. These crispy, cheesy bites are not only easy to make but also taste far superior to their boxed counterparts. Perfect for parties, after-school snacks, or movie nights, Homemade Cheeze-Its stand out with their bold flavor and satisfying crunch. Plus, they can be tailored to suit gluten-free or keto diets!
Why You’ll Love This Recipe
- Easy to Make: With simple ingredients and straightforward steps, you can whip up these snacks in no time.
- Flavor Packed: The combination of sharp cheddar cheese and spices makes every bite burst with cheesy goodness.
- Customizable: Adjust the spices or cheese types to create your own unique flavor profile.
- Healthy Snack Option: Made with wholesome ingredients, these crackers are a better alternative to store-bought snacks.
- Perfect for Any Occasion: Whether it’s a casual gathering or a cozy night in, these cheeze-its fit right in.
Tools and Preparation
Before starting your Homemade Cheeze-Its adventure, gather the necessary tools. Having everything ready will streamline the process and make baking more enjoyable.
Essential Tools and Equipment
- Food processor
- Rolling pin
- Baking sheet
- Parchment paper
- Plastic wrap
Importance of Each Tool
- Food processor: This tool helps combine ingredients quickly and efficiently, ensuring a uniform dough texture.
- Rolling pin: It allows you to roll out the dough evenly, which is crucial for consistent cracker thickness.
- Baking sheet: A good quality baking sheet ensures even cooking and easy removal of your homemade cheeze-its.
Ingredients
Homemade Cheeze-Its require just a few key ingredients that come together for an irresistible snack.
For the Cheeze-Its:
- 8 ounces shredded sharp cheddar cheese
- 4 tablespoons (½ stick) salted butter (softened)
- ½ teaspoon seasoning salt
- ½ teaspoon garlic powder
- 1 cup all-purpose flour (spooned and leveled)
- 2-3 tablespoons ice water
How to Make Homemade Cheeze-Its
Step 1: Prepare the Dough
- In a food processor or blender, pulse the shredded cheddar cheese, softened butter, seasoning salt, and garlic powder until the mixture is crumbly.
- Add the flour and pulse until the dough resembles coarse sand.
Step 2: Add Ice Water
- Drizzle in the ice water one tablespoon at a time.
- Continue pulsing until the dough begins to form a ball. If necessary, add one more tablespoon of water.
Step 3: Chill the Dough
- Transfer the dough to a sheet of plastic wrap.
- Shape it into a disc, wrap tightly, and refrigerate for at least one hour.
Step 4: Preheat Oven and Roll Out Dough
- Preheat the oven to 350 degrees Fahrenheit.
- Line a baking sheet with parchment paper.
- Cut chilled dough in half and roll out each half on a lightly floured surface to about ⅛-¼ inch thick.
Step 5: Cut Into Squares
- Use a sharp knife or pastry cutter to cut the dough into small squares (approximately 1 inch).
- Poke a hole in the center of each square using a skewer or toothpick.
Step 6: Bake
- Arrange the squares on the prepared baking sheet with small spaces between each piece.
- Bake for 12-16 minutes until crisp and lightly golden around edges.
Step 7: Cool Before Serving
- Remove from oven and let cool completely on baking sheet before serving or storing in an airtight container.
Enjoy your delicious Homemade Cheeze-Its!
How to Serve Homemade Cheeze-Its
Homemade Cheeze-Its are a versatile snack that pairs well with various toppings and dips. You can enjoy them on their own or elevate your snacking experience with these serving suggestions.
Pair with Dips
- Creamy Ranch Dip – A classic pairing that adds a cool and tangy flavor.
- Spicy Salsa – For those who enjoy a kick, salsa complements the cheesy flavor perfectly.
- Guacamole – The creamy texture of guacamole contrasts nicely with the crispiness of the crackers.
Snack Board Addition
- Cheese Platter – Arrange your Homemade Cheeze-Its alongside an assortment of cheeses for a delightful cheese board.
- Charcuterie Board – Include meats like salami or prosciutto for a savory touch to your snack spread.
On-the-Go Snacking
- Lunchbox Treats – Pack these crackers in lunchboxes as a crunchy treat for kids after school.
- Road Trip Snack – Perfect for munching during long drives, these homemade snacks are easy to grab and go.

How to Perfect Homemade Cheeze-Its
To ensure your Homemade Cheeze-Its are as delicious as possible, follow these helpful tips.
- Use Fresh Cheese – Freshly shredded cheese melts better and enhances flavor compared to pre-shredded options.
- Chill the Dough Well – Refrigerating the dough helps maintain its structure, making it easier to roll out and cut into squares.
- Monitor Baking Time – Keep an eye on them while baking; every oven is different, and you want them perfectly golden without burning.
- Experiment with Flavors – Try adding different spices like paprika or cayenne pepper for a unique twist on the classic taste.
Best Side Dishes for Homemade Cheeze-Its
Homemade Cheeze-Its can be enjoyed alongside various side dishes. Here are some great options to consider:
- Fresh Veggies – Crisp celery, carrots, or bell peppers add a refreshing crunch that complements the cheese flavor.
- Fruit Slices – Apples or pears provide a sweet contrast that balances the savory notes of the crackers.
- Hummus – This creamy dip not only pairs well but also adds healthy protein to your snack time.
- Olives – Their briny taste enhances the salty flavor of Homemade Cheeze-Its, making for an irresistible combination.
- Pickles – Tangy and crunchy pickles can cut through the richness of the cheese crackers beautifully.
- Mixed Nuts – A handful of mixed nuts adds both crunch and healthy fats, creating a balanced snack option.
Common Mistakes to Avoid
Homemade Cheeze-Its can be easy to make, but some common mistakes can lead to disappointing results. Here are a few pitfalls to watch out for.
- Using the wrong cheese: Choosing mild cheese can lead to bland flavors. Stick with sharp cheddar for a bold taste.
- Not chilling the dough: Skipping refrigeration may result in dough that’s too soft, making it hard to cut. Always chill your dough for at least an hour.
- Cutting uneven squares: Uneven sizes will bake unevenly. Use a ruler or template for consistent 1-inch squares.
- Overbaking the crackers: Baking them too long can result in burnt edges. Keep an eye on them and remove once golden brown.
- Skipping the seasoning: Forgetting the seasoning salt means missing out on flavor. Don’t skip this step for that perfect cheesy kick.
Storage & Reheating Instructions
Refrigerator Storage
- Store Homemade Cheeze-Its in an airtight container.
- They will stay fresh for up to one week in the refrigerator.
Freezing Homemade Cheeze-Its
- Place cooled crackers in a freezer-safe bag or container.
- They can be frozen for up to three months.
Reheating Homemade Cheeze-Its
- Oven: Preheat to 350°F and bake for 5-7 minutes until warm and crispy.
- Microwave: Heat on high for about 10-15 seconds; be careful not to overdo it.
- Stovetop: Place them in a skillet over low heat, turning often until warmed through.
Frequently Asked Questions
Here are some common questions about Homemade Cheeze-Its that might help you make your batch even better!
Can I use gluten-free flour for Homemade Cheeze-Its?
Yes, you can easily substitute all-purpose flour with gluten-free flour blends without compromising texture.
How do I customize Homemade Cheeze-Its?
Feel free to add herbs or spices like paprika or cayenne pepper for extra flavor and heat!
Can I use different types of cheese?
Absolutely! Mixing cheeses like Monterey Jack or Gouda adds interesting flavors while keeping that cheesy goodness.
How do I store leftover Homemade Cheeze-Its?
Keep them in an airtight container at room temperature for up to a week, or refrigerate if you want them fresher longer.
Final Thoughts
Homemade Cheeze-Its are not only delicious but also versatile. With endless customization options, you can tailor these snacks to fit any flavor profile you desire. Give this recipe a try, and enjoy your crunchy, cheesy treats!
Homemade Cheeze-Its
- Total Time: 30 minutes
- Yield: About 40 crackers 1x
Description
Homemade Cheeze-Its are a delightful twist on the classic snack, offering a crispy, cheesy experience that far exceeds store-bought options. These easy-to-make bites are perfect for parties, movie nights, or as an after-school treat. With a bold flavor profile thanks to sharp cheddar cheese and customizable spice options, these cheezy snacks can also cater to gluten-free or keto diets. Enjoy them on their own or pair with your favorite dips for an elevated snacking experience!
Ingredients
- 8 ounces shredded sharp cheddar cheese
- 4 tablespoons salted butter (softened)
- ½ teaspoon seasoning salt
- ½ teaspoon garlic powder
- 1 cup all-purpose flour
- 2–3 tablespoons ice water
Instructions
- In a food processor, combine the shredded cheddar cheese, softened butter, seasoning salt, and garlic powder until crumbly.
- Add the flour and pulse until the mixture resembles coarse sand.
- Slowly drizzle in the ice water one tablespoon at a time until a dough forms.
- Wrap the dough in plastic wrap and refrigerate for at least one hour.
- Preheat oven to 350°F and line a baking sheet with parchment paper.
- Roll out the chilled dough to about ⅛-¼ inch thick and cut into small squares.
- Poke holes in each square with a toothpick and bake for 12-16 minutes until golden.
- Prep Time: 15 minutes
- Cook Time: 15 minutes
- Category: Snack
- Method: Baking
- Cuisine: American
Nutrition
- Serving Size: 10 crackers (30g)
- Calories: 150
- Sugar: 0g
- Sodium: 250mg
- Fat: 9g
- Saturated Fat: 5g
- Unsaturated Fat: 3g
- Trans Fat: 0g
- Carbohydrates: 14g
- Fiber: 0g
- Protein: 4g
- Cholesterol: 20mg
Leave a Comment