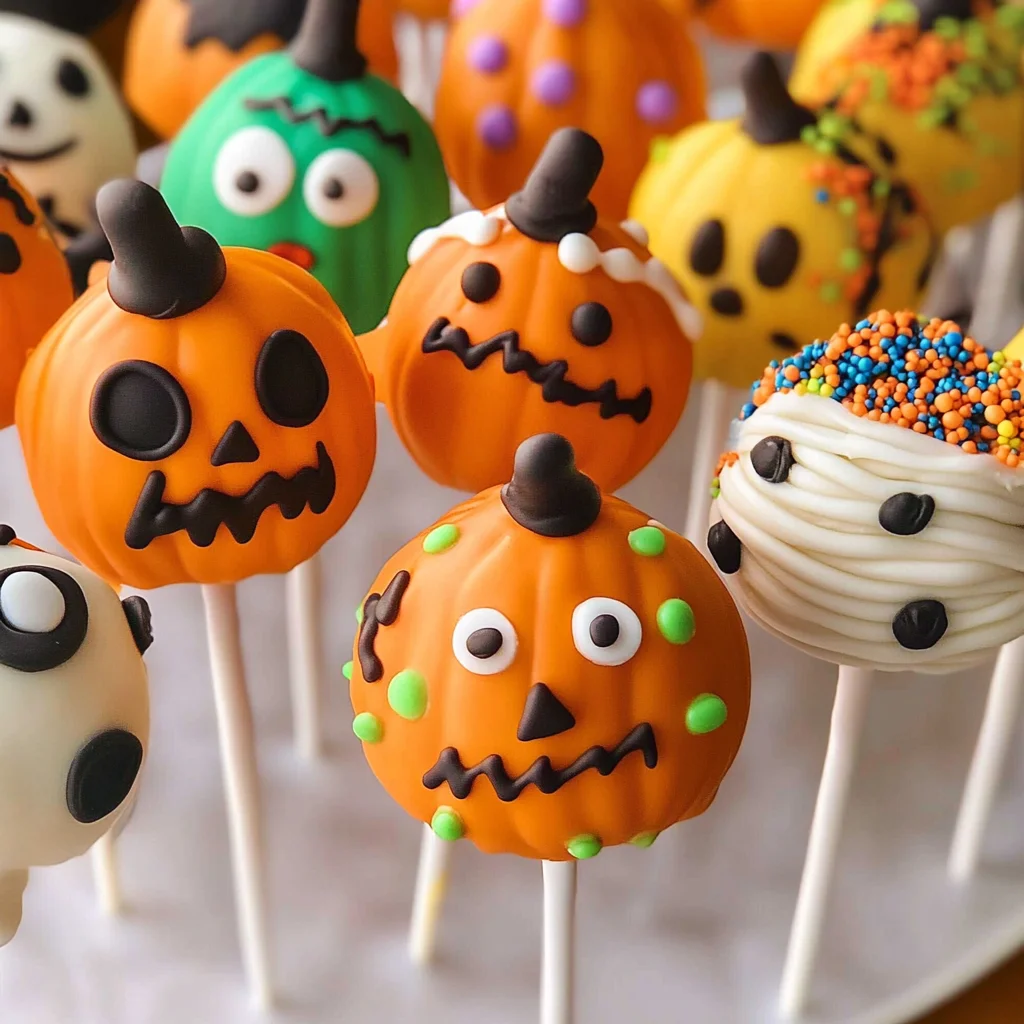
Add these spooky cake pops to your next Halloween party. Halloween Cake Pops are not only delicious but also fun to decorate! These bite-sized treats can be created using vanilla or chocolate cake, making them perfect for any celebration. Their versatility allows you to customize them as pumpkins, Frankenstein, or mummies, ensuring a festive touch at your gathering.
Why You’ll Love This Recipe
- Easy to Make: With simple ingredients and straightforward steps, anyone can whip up these Halloween Cake Pops in no time.
- Customizable Designs: You can unleash your creativity with various decorations, allowing you to make each pop unique.
- Perfect for Parties: These delightful treats are an excellent addition to any Halloween party, sure to impress guests of all ages.
- Delicious Flavor: The combination of moist cake and sweet frosting makes for a delectable bite-sized dessert that’s irresistible.
- Fun for Kids: This recipe is a great way to get kids involved in the kitchen, creating spooky treats together.
Tools and Preparation
Before diving into the preparation of your Halloween Cake Pops, gather the necessary tools. Having everything ready will streamline your baking process.
Essential Tools and Equipment
- Cake pan (13 x 9 inches)
- Mixing bowls
- Electric mixer
- Measuring cups and spoons
- Refrigerator
- Microwave-safe bowl or stove top
- Baking sheet
Importance of Each Tool
- Electric mixer: Ensures that the batter is mixed evenly and saves time compared to mixing by hand.
- Refrigerator: Essential for chilling the cake balls, helping them hold their shape before coating.
- Microwave-safe bowl: Allows for easy melting of Candy Melts without burning them.
Ingredients
To create your Halloween Cake Pops, gather the following ingredients:
- 1 box Favorite cake mix
- 1 3.4 oz box instant pudding mix
- 4 eggs
- 1 cup water
- 1/3 cup vegetable oil
- 1 cup Frosting
- Candy Melts
- Toppings: sprinkles, candy eyes
How to Make Halloween Cake Pops
Step 1: Preheat the Oven
Preheat your oven to 350°F. Spray your 13 x 9 pan with vegetable pan spray to prevent sticking.
Step 2: Prepare the Batter
In a large bowl:
1. Combine cake mix, pudding mix, eggs, water, and oil.
2. Beat at medium speed for about 2 minutes until smooth.
3. Pour into the lightly greased cake pan.
Step 3: Bake the Cake
Bake in the preheated oven for 30–40 minutes:
1. Check if a toothpick inserted in the center comes out clean.
2. Once done, cool in the pan for about 10 minutes.
Step 4: Crumble the Cake
After cooling:
1. In a large bowl, crumble the cake using your hands until no large chunks remain.
2. You can use two forks to help with this process.
Step 5: Mix in Frosting
Add frosting to the crumbled cake:
1. Use your fingers to mix until well combined.
2. Ensure that all pieces are coated with frosting.
Step 6: Form Cake Balls
Take small portions of the mixture and roll them into balls:
– Aim for uniform sizes so they cook evenly.
Step 7: Chill Cake Balls
Place the formed balls on a tray:
– Chill in the refrigerator for at least two hours to allow them to harden.
Step 8: Melt Candy Melts
In a microwave-safe bowl:
1. Melt Candy Melts in intervals of 30 seconds on low power.
2. Stir after each interval until smooth.
Step 9: Insert Sticks into Cake Balls
Dip sticks into melted Candy Melts:
1. Insert them into each chilled cake ball.
2. Allow them to set; you can place them in the freezer for about 20 minutes.
Step 10: Dip Pops in Candy Melts
Wait until candy is completely firm:
– Dip each pop completely into melted Candy Melts again.
Step 11: Decorate Your Pops
Finally, sprinkle on your favorite decorations:
– Use chopped candy, nuts, or sprinkles to give each pop a festive look!
Enjoy creating these delightful Halloween Cake Pops that are sure to be a hit at any festive gathering!
How to Serve Halloween Cake Pops
Halloween cake pops are a fun and festive treat that can add a delightful touch to your Halloween gathering. Here are some creative serving suggestions to impress your guests.
On a Spooky Platter
- Arrange the cake pops on a black or orange platter for a striking visual effect.
- Use decorative cobwebs or fake spiders around the platter for an extra spooky touch.
In Treat Bags
- Place individual cake pops in clear treat bags and tie them with orange ribbon.
- These make great party favors that guests can take home!
Displayed in a Pumpkin
- Hollow out a small pumpkin and use it as a stand for your cake pops.
- This adds a seasonal element that fits perfectly with the Halloween theme.
As Part of a Dessert Table
- Include your Halloween cake pops alongside other themed desserts like ghost cookies and candy corn cupcakes.
- Create height on your dessert table using cake stands.
With Themed Drinks
- Serve your cake pops with themed drinks like pumpkin spice lattes or spooky punch.
- Pairing them enhances the overall Halloween experience for your guests.
For Kids’ Parties
- Use bright colors and fun decorations suitable for children.
- Consider adding edible glitter or colorful sprinkles for an eye-catching look.
How to Perfect Halloween Cake Pops
To ensure your Halloween cake pops turn out perfectly, follow these essential tips.
- Use Quality Ingredients: Selecting high-quality ingredients will enhance the flavor of your cake pops.
- Cool Properly: Make sure the cake is completely cool before crumbling; this prevents sogginess.
- Chill Before Dipping: Chilling the formed cake balls helps them hold their shape when dipped in melted candy melts.
- Melt Candy Melts Slowly: Heat candy melts in short intervals to avoid burning; stirring frequently helps achieve smoothness.
- Decorate Quickly: After dipping, add decorations while the coating is still wet for better adherence.
- Store Correctly: Keep any leftovers in an airtight container at room temperature for up to three days.
Best Side Dishes for Halloween Cake Pops
Halloween parties are all about creating an exciting atmosphere, and pairing side dishes with your Halloween cake pops can elevate any celebration. Here are some fantastic side dish ideas:
- Witch’s Brew Soup: A hearty green soup served in cauldrons makes for a spooky starter.
- Monster Finger Sandwiches: Sandwiches shaped like fingers with almond slivers as nails create an eerie effect.
- Mummy Hot Dogs: Wrap hot dogs in crescent roll dough to resemble mummies, complete with mustard eyes.
- Ghostly Mashed Potatoes: Shape mashed potatoes into ghosts and use olives for eyes; it’s both cute and delicious!
- Pumpkin Deviled Eggs: Add paprika and chives to deviled eggs to give them a pumpkin-like appearance.
- Creepy Veggie Platter: Arrange veggies like carrots and cucumbers into ghost shapes alongside hummus dip for healthy snacking.
- Spooky Cheese Board: Feature cheeses carved into spooky shapes, paired with crackers and fruits for variety.
- Candy Corn Fruit Cups: Layer oranges, pineapples, and whipped cream in cups to mimic candy corn’s colors.
These side dishes will perfectly complement your Halloween cake pops!
Common Mistakes to Avoid
Making Halloween Cake Pops can be fun, but there are some common pitfalls to watch out for.
- Skipping the chilling step: Failing to chill the cake pops can make them difficult to dip. Always refrigerate for at least 2 hours.
- Using too much frosting: Adding too much frosting makes the mixture overly moist. Use just enough to bind the cake without making it soggy.
- Not melting Candy Melts properly: Melting Candy Melts too quickly can cause them to burn. Use 30-second intervals in the microwave for best results.
- Forgetting to let them set: Once dipped, allow cake pops to harden completely before decorating. This prevents messiness and ensures a clean finish.
Storage & Reheating Instructions
Refrigerator Storage
- Store your Halloween Cake Pops in an airtight container.
- They can last up to 5 days in the refrigerator.
Freezing Halloween Cake Pops
- Wrap each pop individually in plastic wrap or aluminum foil.
- They can be frozen for up to 3 months for future enjoyment.
Reheating Halloween Cake Pops
- Oven: Preheat the oven to 200°F and place pops on a baking sheet for about 5 minutes, just enough to warm slightly.
- Microwave: Heat each pop on a microwave-safe plate for about 10 seconds. Be cautious not to melt the coating.
- Stovetop: Place a small pot of water on low heat and set a heatproof dish with cake pops above it, warming gently.
Frequently Asked Questions
Here are some common questions about making Halloween Cake Pops:
How do I make Halloween Cake Pops?
To make Halloween Cake Pops, bake your favorite cake, crumble it, mix with frosting, form into balls, chill, dip in melted Candy Melts, and decorate!
Can I use different flavors for Halloween Cake Pops?
Absolutely! You can use any cake flavor you like. Chocolate or vanilla works great, but feel free to experiment with others.
How long do Halloween Cake Pops last?
Stored properly in an airtight container, they will last about 5 days in the refrigerator and up to 3 months in the freezer.
What toppings can I use for Halloween Cake Pops?
You can use sprinkles, chopped candies, nuts, or even edible glitter! Get creative with your Halloween-themed decorations.
Can I customize my Halloween Cake Pops?
Yes! You can adjust flavors and decorations based on your preference. Try different shapes or themes for various occasions!
Final Thoughts
These Halloween Cake Pops are not only delicious but also fun to create and customize. Their versatility makes them perfect for any party or gathering. Whether you choose spooky designs or sweet decorations, these treats will delight everyone. Don’t hesitate—try making these festive pops at your next celebration!

Halloween Cake Pops
- Total Time: 1 hour
- Yield: Approximately 24 servings 1x
Description
Get ready to add a festive twist to your Halloween celebrations with these delightful Halloween Cake Pops! These bite-sized treats are not only delicious but also incredibly easy to make. With a combination of moist cake and sweet frosting, you can customize the decorations to create spooky designs like pumpkins, mummies, or Frankenstein. Perfect for parties or family gatherings, these cake pops will surely impress guests of all ages. Involve the kids in decorating for a fun family activity that results in tasty treats everyone will love!
Ingredients
- 1 box favorite cake mix
- 1 3.4 oz box instant pudding mix
- 4 eggs
- 1 cup water
- 1/3 cup vegetable oil
- 1 cup frosting
- Candy melts (for coating)
- Toppings such as sprinkles and candy eyes
Instructions
- Preheat oven to 350°F and prepare a 13 x 9 inch pan.
- In a large bowl, mix cake mix, pudding mix, eggs, water, and oil on medium speed for about 2 minutes until smooth.
- Pour batter into the pan and bake for 30–40 minutes, checking for doneness with a toothpick.
- Allow cake to cool before crumbling it into fine pieces in a bowl.
- Mix in frosting until well combined.
- Roll mixture into uniform balls and chill for at least two hours.
- Melt candy melts in intervals until smooth.
- Insert sticks into chilled cake balls, dip them in melted coating, and decorate as desired.
- Prep Time: 20 minutes
- Cook Time: 40 minutes
- Category: Dessert
- Method: Baking
- Cuisine: American
Nutrition
- Serving Size: 1 cake pop (45g)
- Calories: 150
- Sugar: 14g
- Sodium: 50mg
- Fat: 7g
- Saturated Fat: 2g
- Unsaturated Fat: 4g
- Trans Fat: 0g
- Carbohydrates: 19g
- Fiber: <1g
- Protein: 2g
- Cholesterol: 35mg


Leave a Comment