
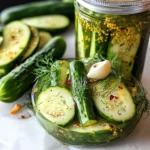
If you love pickles, you can make your own at home with this fantastic Refrigerator Dill Pickles recipe! Fresh cucumber slices in a homemade pickle brine with pickling spices, fresh garlic, and dill – you’ll be so surprised how easy it is to make homemade pickles that taste way better than store-bought pickles! Perfect for picnics, barbecues, or simply snacking at home, these refrigerator dill pickles offer a burst of flavor that enhances any meal.
Why You’ll Love This Recipe
- Easy to Make: With minimal ingredients and straightforward steps, you can whip these up in no time.
- Fresh Flavor: Using fresh cucumbers and herbs ensures a crisp, vibrant taste that outshines store-bought options.
- Versatile Use: Great as a side dish, sandwich topping, or snack right out of the jar!
- Quick Refrigeration: No lengthy canning process; just let them chill in your fridge for 24 hours.
- Customizable: Adjust the spices and flavors to suit your personal taste.
Tools and Preparation
Having the right tools makes preparing Refrigerator Dill Pickles a breeze. Below are some essential items you’ll need.
Essential Tools and Equipment
- Mason jars or glass containers
- Medium saucepan
- Cutting board
- Knife
- Measuring cups and spoons
Importance of Each Tool
- Mason jars or glass containers: These are essential for storing your pickles. They keep the contents fresh and allow for easy access.
- Medium saucepan: Perfect for heating the brine mixture evenly without burning.
- Cutting board and knife: A sturdy cutting board provides stability when slicing cucumbers, ensuring safety and ease during preparation.
Ingredients
For the Brine
- 3 cups water
- 3/4 cup white vinegar
- 3 tablespoons granulated sugar
- 2 tablespoons kosher salt
For the Pickles
- 6 small cucumbers
- 8 sprigs fresh dill
- 4 cloves garlic (peeled and sliced thin)
- 2 tablespoons pickling spice
How to Make Refrigerator Dill Pickles
Step 1: Prepare the Brine
In a medium saucepan, combine the water, vinegar, granulated sugar, and 2 tablespoons of salt. Bring this mixture to a boil over medium to medium-high heat. Once boiling, reduce the heat to low and let it simmer for 15 minutes. After simmering, set aside to cool.
Step 2: Prepare the Cucumbers
Wash the cucumbers thoroughly. Cut each cucumber into 4 spears for a total of 24 spears. If any cucumbers are too tall for your jars, trim one end so they fit perfectly. Pack each jar with cucumber spears—don’t worry if not all fit; save extras for another use.
Step 3: Add Flavorings
Push the fresh dill sprigs down between the cucumbers in each jar. Then add the sliced garlic and pickling spices evenly among the jars.
Step 4: Fill with Brine
Pour the warm brine evenly into each jar until they’re filled to the top. Seal each jar tightly with a lid.
Step 5: Refrigerate
Place your jars in the refrigerator for at least 24 hours before enjoying. These refrigerator dill pickles can stay fresh in your fridge for up to one month—just remember to discard any leftovers after that time!
How to Serve Refrigerator Dill Pickles
Refrigerator Dill Pickles are a versatile addition to many meals. Whether you’re hosting a barbecue or just enjoying a casual lunch, these pickles can elevate your dishes and add a refreshing crunch.
As a Snack
- Enjoy them straight from the jar for a quick and tasty treat.
On Sandwiches
- Slice them thin and layer them on sandwiches or burgers for an extra zing.
In Salads
- Chop the pickles into small pieces and toss them in salads for added flavor and texture.
With Charcuterie Boards
- Include these pickles on your charcuterie board to complement cheeses and meats.
As a Side Dish
- Serve alongside grilled meats to balance out rich flavors with their tanginess.
In Tacos
- Add slices of pickles to tacos for an unexpected twist that enhances your meal.

How to Perfect Refrigerator Dill Pickles
Making the best Refrigerator Dill Pickles involves some simple techniques. Follow these tips to ensure your pickles are always crunchy and full of flavor.
- Choose fresh cucumbers – Select firm cucumbers with no soft spots for the best texture.
- Use plenty of dill – Fresh dill enhances the pickle’s flavor. Don’t skimp!
- Properly cool the brine – Allow the brine to cool before pouring it over the cucumbers; this helps maintain crunchiness.
- Experiment with spices – Feel free to adjust the pickling spices according to your taste preferences.
- Store in airtight containers – Ensure jars are sealed tightly to preserve freshness in the fridge.
Best Side Dishes for Refrigerator Dill Pickles
Refrigerator Dill Pickles pair wonderfully with various side dishes. Here are some fantastic options that complement their tangy flavor perfectly.
- Potato Salad – Creamy potato salad is a classic choice that balances the acidity of the pickles.
- Coleslaw – Crunchy coleslaw adds freshness that pairs well with tangy pickles.
- Corn on the Cob – Sweet corn contrasts beautifully with the sharpness of dill pickles.
- Baked Beans – The sweetness of baked beans is a delightful contrast to vinegary pickles.
- Deviled Eggs – Add chopped pickles into deviled eggs for an extra punch of flavor.
- Grilled Vegetables – Charred veggies provide a smoky taste that complements the crispness of pickles.
Common Mistakes to Avoid
Making your own Refrigerator Dill Pickles is simple, but a few common mistakes can affect the final result.
- Using unwashed cucumbers: Always wash your cucumbers before slicing. Dirt can impact flavor and spoilage.
- Ignoring the brine cooling time: Skipping the cooling step can lead to soggy pickles. Allow the brine to cool before pouring it over cucumbers.
- Overpacking jars: Stuffing too many cucumbers in jars can prevent even brining. Leave some space for the brine to circulate.
- Forgetting to refrigerate: These pickles are not shelf-stable. Keep them in the fridge right after sealing for best results.
- Not allowing enough time to pickle: Refrigerating for at least 24 hours is essential. This waiting period helps flavors develop properly.
Refrigerator Storage
- Store your Refrigerator Dill Pickles in airtight containers or glass jars.
- They can be kept in the fridge for up to one month.
- Label jars with the date made for easy tracking.
Freezing Refrigerator Dill Pickles
- Freezing is not recommended as it alters texture and flavor.
- If necessary, you can freeze pickles for up to 3 months, but expect changes upon thawing.
Reheating Refrigerator Dill Pickles
- Oven: Preheat to 350°F (175°C). Place pickles on a baking tray and warm for about 10 minutes.
- Microwave: Heat on medium power in short intervals of 30 seconds until warm, checking often.
- Stovetop: Gently heat pickles in a pot over low heat, stirring occasionally until warm.
Frequently Asked Questions
Here are some common questions about making Refrigerator Dill Pickles.
How long do Refrigerator Dill Pickles last?
Refrigerator Dill Pickles last for up to one month when stored properly in the fridge.
Can I customize my Refrigerator Dill Pickles?
Absolutely! Feel free to add spices like red pepper flakes or mustard seeds for extra flavor.
What type of cucumbers are best for Refrigerator Dill Pickles?
Use small cucumbers such as Kirby or Persian varieties for crunchiness and flavor.
Are Refrigerator Dill Pickles gluten-free?
Yes, this recipe is naturally gluten-free as it does not contain any gluten ingredients.
Can I use other vinegars for my pickling brine?
Yes, you can experiment with apple cider vinegar or rice vinegar. Just note that flavors may change slightly.
Final Thoughts
Making Refrigerator Dill Pickles at home is a delightful experience that brings fresh flavors to your table. With their crunchy texture and tangy taste, these pickles are perfect as snacks or sides. Feel free to customize them with your favorite spices or herbs to suit your personal taste!
Refrigerator Dill Pickles
- Total Time: 30 minutes
- Yield: Approximately 24 pickle spears 1x
Description
If you’re a pickle lover, you’ll enjoy creating your own Refrigerator Dill Pickles at home. This easy recipe brings together fresh cucumber slices in a zesty brine infused with garlic and dill, delivering a burst of flavor that far surpasses anything store-bought. Perfect for snacking, barbecues, or as a side dish, these crunchy pickles can be made in just a few simple steps. With no canning required, you can have delicious homemade pickles ready to enjoy within 24 hours. Customize the spices to suit your taste and elevate your meals effortlessly!
Ingredients
- 3 cups water
- 3/4 cup white vinegar
- 3 tablespoons granulated sugar
- 2 tablespoons kosher salt
- 6 small cucumbers
- 8 sprigs fresh dill
- 4 cloves garlic (peeled and sliced thin)
- 2 tablespoons pickling spice
Instructions
- In a medium saucepan, combine water, vinegar, sugar, and salt. Bring to a boil over medium heat, then simmer for 15 minutes. Cool the brine.
- Wash cucumbers and cut them into spears. Pack them into jars.
- Add dill sprigs, garlic, and pickling spices to the jars.
- Pour the cooled brine over the cucumbers until fully submerged.
- Seal jars tightly and refrigerate for at least 24 hours before enjoying.
- Prep Time: 15 minutes
- Cook Time: 15 minutes
- Category: Snack
- Method: Refrigeration
- Cuisine: American
Nutrition
- Serving Size: 1 pickle spear (30g)
- Calories: 6
- Sugar: 1g
- Sodium: 120mg
- Fat: 0g
- Saturated Fat: 0g
- Unsaturated Fat: 0g
- Trans Fat: 0g
- Carbohydrates: 1g
- Fiber: 0g
- Protein: <1g
- Cholesterol: 0mg
Leave a Comment