
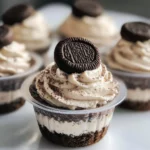
Cookies and cream dessert cups are a delightful treat that everyone will love! Perfect for parties, these no-bake dessert cups feature a crunchy Oreo cookie crust and a rich, creamy filling. They are easy to prepare and can be made ahead of time, making them ideal for any occasion. Whether it’s a birthday party, holiday gathering, or just a sweet indulgence at home, these dessert cups are sure to impress with their layered flavors and fun presentation.
Why You’ll Love This Recipe
- No bake convenience: These dessert cups require no baking, saving you time and effort in the kitchen.
- Crowd-pleaser: The combination of cookies and cream flavors is universally loved, making them a hit at any gathering.
- Versatile serving size: With 28 mini cups, they’re perfect for sharing or enjoying as individual treats.
- Easy customization: Feel free to add different toppings or mix-ins to suit your taste preferences.
- Quick preparation: Ready in just 30 minutes, these cups are an effortless way to satisfy your sweet tooth.
Tools and Preparation
Before diving into the recipe, gather your tools. Having everything ready will make the process smooth and enjoyable.
Essential Tools and Equipment
- Small mixing bowl
- Electric hand mixer
- Plastic cups (2-ounce)
- Piping bag or plastic sandwich bag
- Cookie scoop or spoon
Importance of Each Tool
- Electric hand mixer: This tool makes it easy to blend ingredients quickly, ensuring a smooth filling without lumps.
- Piping bag: Using a piping bag helps you fill the dessert cups neatly, giving them a professional look.
Ingredients
Ingredients for Cookies and Cream Dessert Cups:
– 2 cups crushed chocolate sandwich cookies
– ¼ cup butter (melted)
– 8 oz cream cheese (room temperature)
– ¾ cup granulated sugar
– 2 tsp vanilla extract
– 1 ½ cups heavy cream
– ½ cup crushed chocolate sandwich cookies
– 28 mini chocolate sandwich cookies
How to Make Cookies and Cream Dessert Cups
Step 1: Prepare the Crust
In a small bowl, combine the 2 cups of crushed chocolate sandwich cookies with the ¼ cup of melted butter. Mix until well combined.
Step 2: Fill the Cups with Crust
Portion the cookie mixture into 28 mini plastic cups using either a small cookie scoop or spoon. Press down firmly on the crumbs in each cup to form an even crust layer at the bottom.
Step 3: Create the Filling
In another mixing bowl, beat together the 8 oz of room temperature cream cheese and ¾ cup of granulated sugar. Use an electric hand mixer on medium speed until smooth and creamy.
Step 4: Whip the Cream
Add in the 1 ½ cups of heavy cream and 2 tsp of vanilla extract. Increase speed to medium-high and whip until the mixture becomes light and fluffy.
Step 5: Incorporate Cookie Crumbs
Gently fold in ½ cup of additional crushed chocolate sandwich cookies. This adds texture to your creamy filling.
Step 6: Pipe into Cups
Fill a piping bag with the cookies and cream mixture. Pipe into each cup until they are about three-quarters full.
Step 7: Add Toppings
Top each dessert cup with a mini chocolate sandwich cookie or sprinkle some extra cookie crumbs on top for decoration.
Step 8: Chill Before Serving
Seal each cup with its lid and chill in the refrigerator. These dessert cups can be served immediately but also store well for up to 2-3 days in the fridge. Enjoy your delicious Cookies and Cream Dessert Cups!
How to Serve Cookies and Cream Dessert Cups
These delightful cookies and cream dessert cups are not just a treat for the taste buds; they make for an impressive presentation at any gathering. Here are some fun serving suggestions to elevate your dessert experience.
Individual Portions
- Serve each cup individually for a charming look. This allows guests to enjoy their own personal dessert without any fuss.
Party Platters
- Arrange several cups on a decorative platter. Mixing in some fresh berries or mint leaves can add a pop of color and freshness to your display.
Tasting Flight
- Create a dessert tasting flight by pairing these cups with other mini desserts. This way, guests can sample a variety of flavors while enjoying the cookies and cream goodness.
Kid-Friendly Treats
- Use colorful plastic cups to serve these dessert cups at children’s parties. Kids love the fun size and the playful look!
Themed Decor
- Match the color scheme of your event with themed decorations around the cups. For instance, use chocolate drizzles or sprinkles that complement your party colors.
Chill Before Serving
- For an extra refreshing treat, chill the cups in the fridge before serving. The coolness makes them even more enjoyable!

How to Perfect Cookies and Cream Dessert Cups
To ensure your cookies and cream dessert cups turn out perfectly every time, consider these helpful tips.
- Use room temperature cream cheese: This helps achieve a smooth filling without lumps.
- Whip heavy cream properly: Make sure to whip until stiff peaks form for a light and fluffy texture.
- Don’t skip chilling: Allowing the dessert cups to chill enhances the flavors and improves texture.
- Customize toppings: Feel free to get creative! Add different cookie types or chocolate shavings for variety.
- Utilize piping bags: Using piping bags makes filling the cups easier and helps achieve a neat presentation.
- Store correctly: Keep covered in the fridge if not serving immediately, ensuring freshness for up to 3 days.
Best Side Dishes for Cookies and Cream Dessert Cups
Pairing side dishes with cookies and cream dessert cups can enhance your dessert experience. Consider these delicious options that complement the rich flavors of your main treat.
- Fresh Fruit Salad: A mix of seasonal fruits adds brightness and balances the sweetness of the dessert.
- Chocolate-Covered Strawberries: These decadent bites bring together chocolate and fruit, echoing the flavors in your dessert.
- Mini Cheesecakes: Offering another creamy treat, mini cheesecakes provide variety while staying within a similar flavor profile.
- Brownie Bites: Chewy brownie bites are always a hit, adding richness that pairs well with cookies and cream.
- Ice Cream Floats: Choose vanilla or chocolate soda floats for a fun twist that complements the creamy texture of your dessert cups.
- Coffee or Espresso Shots: A small cup of coffee or espresso can cut through sweetness while enhancing flavor appreciation.
- Pretzel Bites with Chocolate Dip: The salty-sweet combination works beautifully alongside your sweet treats.
- Caramel Popcorn: This snack offers crunchiness and sweetness, making it an enjoyable addition to your dessert spread.
Common Mistakes to Avoid
Mistakes can happen while making Cookies and Cream Dessert Cups. Here are a few common pitfalls and how to steer clear of them.
- Incorrect crust consistency: If your Oreo cookie crust is too dry, it won’t hold together. Make sure to blend the crushed cookies thoroughly with melted butter until it resembles wet sand.
- Overmixing the filling: Overwhipping the cream can lead to a grainy texture. Mix just until soft peaks form for a smooth filling.
- Using cold cream cheese: Cold cream cheese can create lumps in your filling. Always ensure it’s at room temperature for smooth blending.
- Skipping chilling time: Not chilling the cups long enough may result in a runny filling. Allow them to chill for at least 2 hours before serving for the best texture.
- Not measuring ingredients accurately: Improper measurements can alter the balance of flavors or textures. Use precise measuring tools for best results.
Storage & Reheating Instructions
Refrigerator Storage
- Keep Cookies and Cream Dessert Cups in an airtight container.
- They will stay fresh in the fridge for up to 3 days.
Freezing Cookies and Cream Dessert Cups
- You can freeze these dessert cups, but it’s best to do so without the cookie topping.
- Store them in a freezer-safe container for up to 2 months.
Reheating Cookies and Cream Dessert Cups
- Oven: Preheat to 350°F (175°C) and warm covered for about 10 minutes. This is not typical since they are served cold.
- Microwave: Heat on low power in short bursts, checking frequently. This method is not recommended as it may alter texture.
- Stovetop: Not suitable for reheating; these dessert cups are best enjoyed cold.
Frequently Asked Questions
If you have questions about making Cookies and Cream Dessert Cups, find answers below!
How long do Cookies and Cream Dessert Cups last?
These dessert cups last up to 3 days in the refrigerator when stored properly in an airtight container.
Can I customize my Cookies and Cream Dessert Cups?
Absolutely! You can add different toppings like chocolate chips, whipped cream, or even fruit slices for added flavor and texture.
Are Cookies and Cream Dessert Cups suitable for parties?
Yes! These treat cups are perfect for parties due to their individual servings and no-bake nature, making them easy to prepare ahead of time.
Can I use gluten-free cookies for this recipe?
Yes! Substitute regular chocolate sandwich cookies with gluten-free options, making this dessert accessible for everyone.
What other flavors can I use instead of cookies and cream?
Feel free to experiment with flavors like vanilla bean, chocolate mousse, or even strawberry cheesecake for variety!
Final Thoughts
Cookies and Cream Dessert Cups are a delightful treat that combines simplicity with indulgence. Their versatility allows you to customize them with different toppings or flavors, making them suitable for any occasion. Try this recipe today, and enjoy a refreshing twist on a classic favorite!
Cookies and Cream Dessert Cups
- Total Time: 0 hours
- Yield: Makes 28 servings 1x
Description
Indulge in the delightful world of Cookies and Cream Dessert Cups, a no-bake treat that brings together the beloved flavors of chocolate sandwich cookies and creamy filling. Perfect for any occasion—be it birthday parties, holiday gatherings, or a sweet night in—these mini dessert cups are sure to impress guests with their fun presentation and layered goodness. With a crunchy Oreo crust and rich, fluffy filling, they are not only easy to make but also customizable to suit various tastes. Ready in just 30 minutes, these dessert cups offer the ideal balance of convenience and indulgence.
Ingredients
- 2 cups crushed chocolate sandwich cookies
- ¼ cup melted butter
- 8 oz cream cheese (room temperature)
- ¾ cup granulated sugar
- 2 tsp vanilla extract
- 1 ½ cups heavy cream
- ½ cup crushed chocolate sandwich cookies (for filling)
- 28 mini chocolate sandwich cookies (for topping)
Instructions
- In a small bowl, mix crushed cookies with melted butter until well combined.
- Portion the cookie mixture into 28 mini cups and press down to form a crust.
- In another bowl, blend cream cheese and sugar until creamy.
- Add heavy cream and vanilla; whip until light and fluffy.
- Fold in crushed cookies for added texture.
- Pipe the filling into each cup until three-quarters full.
- Top with mini cookies or extra crumbs for decoration.
- Chill before serving.
- Prep Time: 20 minutes
- Cook Time: N/A
- Category: Dessert
- Method: No bake
- Cuisine: American
Nutrition
- Serving Size: 1 mini cup (50g)
- Calories: 180
- Sugar: 12g
- Sodium: 90mg
- Fat: 12g
- Saturated Fat: 7g
- Unsaturated Fat: 4g
- Trans Fat: 0g
- Carbohydrates: 16g
- Fiber: 1g
- Protein: 2g
- Cholesterol: 25mg

Leave a Comment