
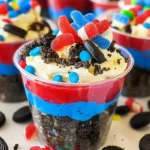
Easy no-bake Red, White and Blue Dirt Cups are the perfect summer dessert for kids and adults alike! These delightful cups feature layers of crushed Oreos and creamy pudding, topped with fun gummy worms. Perfect for 4th of July celebrations or any festive occasion, these dirt cups bring a smile to everyone’s face with their vibrant colors and delicious flavors.
Why You’ll Love This Recipe
- Quick and Easy: This dessert comes together in just 10 minutes with no baking required.
- Kid-Friendly: The fun layers and gummy worms make it a hit with children, ensuring they’ll enjoy every bite.
- Versatile: Customize the colors and toppings for other holidays or events, making them perfect year-round.
- Delicious Layers: The combination of crushed Oreos and creamy cheesecake pudding creates a delightful texture that everyone loves.
- Make Ahead: Prepare these dirt cups in advance to save time during your celebration.
Tools and Preparation
To create your Red, White and Blue Dirt Cups, you will need some essential tools. Having the right equipment will make the process smoother and more enjoyable.
Essential Tools and Equipment
- Mixing bowl
- Whisk
- Plastic cups
- Measuring cups
- Spoon
Importance of Each Tool
- Mixing bowl: A large mixing bowl is crucial for combining all ingredients effectively. It provides enough space to whisk without spills.
- Whisk: Using a whisk ensures that the pudding mixes smoothly without lumps, resulting in a creamy texture.
- Plastic cups: These are perfect for serving individual portions while showcasing the colorful layers of your dirt cups.
Ingredients
To make your delicious Red, White and Blue Dirt Cups, gather the following ingredients:
Pudding Base
- 2 boxes cheesecake pudding (3.4 ounces each)
- 4 cups milk
Crunchy Layer
- 19 Oreo cookies (crushed)
Coloring Agents
- ¼ teaspoon red gel food dye
- ¼ teaspoon blue gel food dye
Fun Toppings
- 8 red and blue gummy worms
How to Make Red, White and Blue Dirt Cups
Creating these delightful dirt cups is easy! Follow these steps for a perfect treat.
Step 1: Prepare the Pudding Mixture
- Place both boxes of pudding in a large mixing bowl.
- Add the milk and whisk until the pudding has thickened.
Step 2: Color the Pudding
- Separate the pudding into two bowls—1 cup in one bowl and 1 ½ cups in another.
- Add the blue dye to the bowl with 1 cup of pudding. Mix until thoroughly combined.
- In the other bowl with 1 ½ cups of pudding, add the red dye. Stir until well mixed.
Step 3: Assemble Your Dirt Cups
- Line up your plastic cups on a flat surface.
- Place 1 tablespoon of crushed Oreos at the bottom of each cup and spread evenly.
- Add 2 tablespoons of blue pudding on top, spreading it evenly over the Oreos.
- Sprinkle another tablespoon of crushed Oreos on top of the blue layer.
- Pour in 3 tablespoons of white pudding as the next layer, spreading evenly.
- Follow with an additional 1 ½ tablespoons of white pudding as another layer, spreading it smoothly.
- Finally, add 4 tablespoons of red pudding as your last main layer.
- Top off each cup with 2 tablespoons of crushed Oreos for that “dirt” look.
Step 4: Final Touches
- Decorate each cup with two gummy worms on top along with one flag per cup for added flair.
- Serve immediately or chill until ready to enjoy!
With these easy steps, you’ll have delicious Red, White and Blue Dirt Cups ready to impress your guests!
How to Serve Red, White and Blue Dirt Cups
Red, White and Blue Dirt Cups are not only delicious but also visually appealing, making them perfect for festive occasions. Here are some fun serving suggestions to elevate your dessert experience.
Individual Cups
- Serve each dirt cup in a clear plastic cup for a fun presentation. The layers of color will shine through, enticing guests to dig in.
Family Style
- Arrange all the cups on a large platter for a communal dessert. This encourages sharing and adds a festive touch to your table setup.
Themed Party Favors
- Wrap each cup with a ribbon and include a small flag. These make perfect party favors for Fourth of July gatherings or summer picnics.
Ice Cream Pairing
- Serve alongside vanilla ice cream for an extra creamy treat. The combination of textures will delight everyone at the table.
Picnic Treats
- Pack these cups in cooler-friendly containers for a picnic. They’re easy to transport and will impress your friends with their festive flair.

How to Perfect Red, White and Blue Dirt Cups
Creating the perfect Red, White and Blue Dirt Cups is all about the little details. Here are some tips to ensure your dessert stands out.
- Chill the Pudding: Make sure the pudding is well-chilled before layering. This helps it set up nicely and keeps the layers defined.
- Use Fresh Ingredients: Fresh gummy worms and quality Oreos enhance flavor and texture, making each bite enjoyable.
- Layer Carefully: Take your time when layering. Use a spoon or spatula to gently spread each layer evenly without mixing colors.
- Customize Colors: Feel free to adjust food dye amounts for deeper shades, or use natural dyes for a healthier twist.
- Add Toppings: Consider adding whipped cream or sprinkles on top of the final layer for added texture and visual appeal.
- Serve Cold: These dirt cups taste best when served cold. Keep them refrigerated until you’re ready to enjoy them!
Best Side Dishes for Red, White and Blue Dirt Cups
Pairing side dishes with your Red, White and Blue Dirt Cups can enhance the overall meal experience. Here are some great options that will complement this festive dessert.
- Grilled Corn on the Cob – Sweet corn grilled with butter enhances summer flavors beautifully.
- Caprese Salad Skewers – Cherry tomatoes, fresh mozzarella, and basil drizzled with balsamic glaze offer a refreshing contrast.
- Watermelon Feta Salad – A light salad that combines juicy watermelon with salty feta cheese; it’s perfect for hot days.
- Deviled Eggs – Classic deviled eggs bring a savory bite that balances out the sweetness of the dirt cups.
- Potato Salad – Creamy potato salad is always a hit at gatherings; consider adding herbs for extra flavor.
- Fruit Kabobs – Mix seasonal fruits on skewers for easy, colorful bites that appeal to both kids and adults.
- Pasta Salad – A cold pasta salad with veggies adds heartiness while keeping things light.
- Cheese Platter – Include various cheeses and crackers for guests to nibble on while enjoying their dirt cups.
Common Mistakes to Avoid
Making Red, White and Blue Dirt Cups can be simple, but a few common mistakes can lead to less-than-perfect results.
- Using warm milk: Always use cold milk for a creamier texture. Warm milk may prevent the pudding from thickening properly.
- Not mixing food dye thoroughly: Ensure that the gel food dye is well mixed into the pudding. Uneven coloring can result in a less appealing presentation.
- Overfilling cups: Don’t overfill your cups. Leave enough space for toppings and avoid spills during serving.
- Skipping the chilling time: While this is a no-bake dessert, letting it chill for at least an hour helps the layers set better and enhances flavors.
- Using stale Oreos: Freshly crushed Oreos create a better texture. Check the expiration date before using them in your recipe.
Refrigerator Storage
- Store your Red, White and Blue Dirt Cups in airtight containers.
- They can last up to 3 days in the refrigerator.
- Keep them away from strong-smelling foods to prevent flavor absorption.
Freezing Red, White and Blue Dirt Cups
- These cups are best enjoyed fresh but can be frozen for up to 2 months.
- Use freezer-safe containers or plastic wrap to prevent freezer burn.
Reheating Red, White and Blue Dirt Cups
- Oven: Not recommended as it can alter the texture of the pudding.
- Microwave: Heat gently in short intervals (10-15 seconds) if needed, but this may change the consistency.
- Stovetop: Not advisable; best enjoyed cold.
Frequently Asked Questions
How long do Red, White and Blue Dirt Cups last?
These delightful cups last about 3 days when stored properly in the refrigerator.
Can I customize my Red, White and Blue Dirt Cups?
Absolutely! You can mix different flavors of pudding or add fresh fruits for extra flavor and nutrition.
Are Red, White and Blue Dirt Cups kid-friendly?
Yes! This dessert is fun to make and eat, making it perfect for kids’ parties or family gatherings.
What occasions are best for serving Red, White and Blue Dirt Cups?
They are perfect for patriotic holidays like Independence Day, Memorial Day, or any summer gathering!
Final Thoughts
Red, White and Blue Dirt Cups are not only visually stunning but also incredibly versatile. They’re perfect for kids’ parties or festive celebrations. Feel free to customize them with your favorite flavors or toppings. Give this fun dessert a try—you won’t be disappointed!
Red, White and Blue Dirt Cups
- Total Time: 10 minutes
- Yield: Serves 8
Description
Red, White and Blue Dirt Cups are the ultimate no-bake summer dessert that brings festive cheer to any gathering. Perfectly layered with crushed Oreos, creamy cheesecake pudding, and topped with playful gummy worms, these cups are a visual delight and a taste sensation. Whether you’re celebrating Independence Day or enjoying a backyard barbecue, this fun dessert is sure to impress kids and adults alike. With just a few simple ingredients and quick preparation time, you can whip up these colorful treats in no time. Get ready to wow your guests with these easy-to-make dirt cups that are as delicious as they are eye-catching!
Ingredients
- 2 boxes cheesecake pudding (3.4 ounces each)
- 4 cups milk
- 19 Oreo cookies (crushed)
- ¼ teaspoon red gel food dye
- ¼ teaspoon blue gel food dye
- 8 gummy worms (red and blue)
Instructions
- In a large mixing bowl, whisk together both boxes of cheesecake pudding and milk until thickened.
- Divide the pudding into two bowls: mix blue dye into one bowl (1 cup) and red dye into the other (1½ cups).
- In clear plastic cups, layer 1 tablespoon of crushed Oreos at the bottom followed by 2 tablespoons of blue pudding.
- Add another tablespoon of crushed Oreos, then pour in 3 tablespoons of white pudding.
- Add an additional layer of white pudding (1½ tablespoons) followed by 4 tablespoons of red pudding.
- Top with remaining crushed Oreos and finish with two gummy worms on each cup.
- Prep Time: 10 minutes
- Cook Time: 0 minutes
- Category: Dessert
- Method: No-bake
- Cuisine: American
Nutrition
- Serving Size: 1 dirt cup (150g)
- Calories: 250
- Sugar: 21g
- Sodium: 180mg
- Fat: 10g
- Saturated Fat: 5g
- Unsaturated Fat: 4g
- Trans Fat: 0g
- Carbohydrates: 35g
- Fiber: 1g
- Protein: 4g
- Cholesterol: 10mg

Leave a Comment