
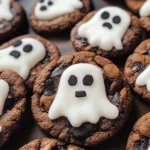
Ghost cookies are the perfect Halloween treat that will delight both kids and adults alike. These spooky snacks are not only easy to make but also add a fun touch to any Halloween party or gathering. With just a few simple ingredients, you can transform ordinary chocolate chunk cookies into adorable ghost-shaped desserts that are sure to impress. Whether for a festive celebration or just a creative baking session at home, ghost cookies bring a playful spirit to the table.
Why You’ll Love This Recipe
- Quick and Easy: This ghost cookies recipe requires minimal preparation and can be made in just 25 minutes.
- Fun for Everyone: Decorating these cookies is a great activity for kids and adults, making it a perfect family project.
- Spooky Appeal: The ghostly design adds an exciting twist to your Halloween treats, making them visually appealing.
- Versatile Treats: These cookies can be enjoyed at various occasions beyond Halloween, such as parties or school events.
- Delicious Flavors: The combination of chocolate chunk cookies and sweet marshmallows creates a delightful flavor that everyone loves.
Tools and Preparation
Before diving into making your ghost cookies, gather the essential tools you’ll need for this recipe. Having everything ready will ensure a smooth baking experience.
Essential Tools and Equipment
- Baking sheet
- Parchment paper
- Mixing bowl
- Spatula or spoon
Importance of Each Tool
- Baking sheet: Provides a sturdy surface for placing your cookies while they cool.
- Parchment paper: Prevents sticking and makes cleanup easy after baking.
- Mixing bowl: Essential for combining your icing ingredients smoothly.
- Spatula or spoon: Useful for spreading icing on the cookies evenly.
Ingredients
Take a pack of cookies and turn them into these spooky Halloween treats
For the Ghost Cookies
- 175g icing sugar
- 1 x 200g pack chocolate chunk cookies
- 9 marshmallows (regular size)
- black writing icing
How to Make Ghost Cookies
Step 1: Prepare Your Baking Sheet
Start by preheating your oven if necessary. Line your baking sheet with parchment paper.
Step 2: Decorate the Cookies
- Take each chocolate chunk cookie and place it on the prepared baking sheet.
- Use a spatula or spoon to spread icing sugar over the top of each cookie until fully covered.
- Place one marshmallow on top of each cookie as the ghost’s head.
Step 3: Add Ghostly Features
- Using black writing icing, carefully draw eyes and mouths on each marshmallow to create spooky faces.
- Let the decorating set for a few minutes before serving.
Enjoy your delicious ghost cookies! They are perfect for sharing with friends or serving at any Halloween gathering.
How to Serve Ghost cookies
These spooky ghost cookies are not only fun to make but also delightful to serve. Perfect for Halloween parties or gatherings, here are some creative ways to present them.
On a Festive Platter
- Arrange the ghost cookies on a colorful platter surrounded by Halloween-themed decorations to create a festive look.
With Hot Chocolate
- Pair these cookies with a warm cup of hot chocolate for a cozy treat that complements the haunting theme.
In a Treat Bag
- Place individual ghost cookies in treat bags as party favors for guests. Tie them with orange and black ribbons for added flair.
As Part of a Dessert Table
- Include the ghost cookies on a dessert table alongside other Halloween treats like cupcakes and candies to create an enticing display.
With Spooky Drinks
- Serve these cookies alongside themed drinks, such as witch’s brew or pumpkin spice lattes, to enhance the festive vibe.
On a Haunted House Cake
- Use ghost cookies as decorative elements on top of a cake designed to look like a haunted house for an eye-catching centerpiece.

How to Perfect Ghost cookies
To ensure your ghost cookies turn out perfectly every time, consider these helpful tips.
- Use Fresh Ingredients: Ensure your marshmallows and icing sugar are fresh for the best taste and consistency.
- Melt Marshmallows Carefully: If you choose to melt the marshmallows, do so gently in short bursts to prevent burning.
- Pipe Icing with Precision: Use a steady hand when applying black writing icing for clear and clean designs.
- Chill Before Serving: Let the finished ghost cookies chill slightly in the fridge. This helps set the icing and makes them easier to handle.
- Customize Faces: Get creative! Change up the expressions on the ghosts for added personality—happy, spooky, or silly faces work great.
- Store Properly: Keep any leftover ghost cookies in an airtight container at room temperature for freshness.
Best Side Dishes for Ghost cookies
Ghost cookies can be paired with various side dishes that elevate your Halloween celebration. Here are some ideas:
- Pumpkin Soup: A warm bowl of creamy pumpkin soup complements the sweetness of ghost cookies beautifully.
- Cheesy Garlic Bread: The savory flavors of cheesy garlic bread provide a perfect contrast to the sweetness of the cookies.
- Crispy Veggie Platter: Fresh veggies with ranch dip create a crunchy side that balances out dessert flavors.
- Fruit Salad: A vibrant fruit salad adds refreshing notes that lighten up the dessert table.
- Mini Quiches: These bite-sized savory treats add variety and are easy to grab while indulging in sweet snacks.
- Spooky Cheese Board: Create a cheese board adorned with Halloween-themed items like bat-shaped crackers or pumpkin-shaped cheese balls.
Common Mistakes to Avoid
Making Ghost cookies can be fun, but avoiding common mistakes ensures your spooky treats turn out perfectly.
- Incorrect measurements: Always weigh your ingredients accurately. Using too much or too little icing sugar can affect the texture and flavor.
- Skipping chilling time: If you decide to chill the cookies before decorating, don’t skip this step! It helps the cookies hold their shape.
- Using stale marshmallows: Fresh marshmallows are key for that fluffy ghost look. Check your marshmallows’ freshness before starting.
- Neglecting decoration details: Don’t rush the decorating process. Take your time to create fun and spooky faces on your ghosts.
- Not tasting as you go: Always taste your icing and cookie dough. This ensures that everything is just right before serving.
Storage & Reheating Instructions
Refrigerator Storage
- Store Ghost cookies in an airtight container for up to 3 days.
- Place parchment paper between layers of cookies to prevent sticking.
Freezing Ghost cookies
- Freeze decorated cookies in a single layer on a baking sheet for 1-2 hours until solid.
- Transfer to a freezer-safe container or bag, storing them for up to 2 months for best quality.
Reheating Ghost cookies
- Oven: Preheat oven to 300°F (150°C). Heat cookies for about 5-7 minutes until warm.
- Microwave: Use a microwave-safe plate. Heat each cookie for about 10-15 seconds only; avoid overheating.
- Stovetop: Place cookies in a skillet over low heat for a few minutes, turning occasionally until warmed through.
Frequently Asked Questions
Here are some questions that often come up regarding making Ghost cookies.
How do I make Ghost cookies?
To make Ghost cookies, simply decorate chocolate chunk cookies with icing sugar, marshmallows, and black writing icing to create ghostly faces.
Can I customize my Ghost cookies?
Absolutely! You can add different toppings like colored sprinkles or edible glitter for added flair and creativity.
What are good alternatives for chocolate chunk cookies?
You can use sugar cookies or vanilla-flavored biscuits if you prefer a different base for your Ghost cookies.
How long do Ghost cookies last?
When stored properly, these delightful treats can last up to 3 days at room temperature or up to 2 months in the freezer.
Final Thoughts
Ghost cookies are not only fun but also versatile Halloween treats that can be customized in countless ways. Whether you want them spooky or silly, they’re sure to delight everyone who tries them. Feel free to get creative with decorations and flavors!
Ghost Cookies
- Total Time: 25 minutes
- Yield: Makes approximately 9 ghost cookies 1x
Description
Ghost cookies are the ultimate festive treat for Halloween, combining delicious chocolate chunk cookies with whimsical marshmallow decorations. These easy-to-make ghostly delights are perfect for parties or a fun family baking activity. With just a handful of ingredients and minimal prep time, you can create charming cookies that will enchant both kids and adults.
Ingredients
- 1 pack (200g) chocolate chunk cookies
- 175g icing sugar
- 9 regular-sized marshmallows
- Black writing icing
Instructions
- Preheat your oven if necessary and line a baking sheet with parchment paper.
- Place each chocolate chunk cookie on the prepared baking sheet.
- Spread icing sugar over the top of each cookie until fully covered.
- Top each cookie with one marshmallow to create the ghost's head.
- Use black writing icing to draw spooky faces on each marshmallow.
- Allow the decorated cookies to set for a few minutes before serving.
- Prep Time: 10 minutes
- Cook Time: 15 minutes
- Category: Dessert
- Method: Baking
- Cuisine: Halloween treats
Nutrition
- Serving Size: 1 cookie (30g)
- Calories: 140
- Sugar: 12g
- Sodium: 55mg
- Fat: 5g
- Saturated Fat: 2g
- Unsaturated Fat: 2g
- Trans Fat: 0g
- Carbohydrates: 21g
- Fiber: 0g
- Protein: 1g
- Cholesterol: 0mg
Leave a Comment