
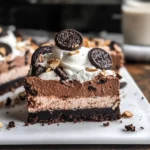
These No Bake Chocolate Mousse Bars are the perfect dessert for any occasion! With a rich, creamy filling and a buttery Oreo crust, they provide a delightful treat without the need for baking. Whether you’re hosting a party or simply craving something sweet, these bars will impress your guests and satisfy your chocolate cravings. The best part? They’re easy to make and can be prepared ahead of time!
Why You’ll Love This Recipe
- No Baking Required: Enjoy a delicious dessert without turning on the oven.
- Decadent Flavor: Indulge in layers of rich chocolate mousse and a crunchy Oreo crust.
- Versatile Topping Options: Customize with chopped Oreos or nuts to suit your taste.
- Perfect for Any Occasion: Great for parties, family gatherings, or just a sweet treat at home.
- Make Ahead Convenience: Prepare in advance and let them chill overnight for the best flavor.
Tools and Preparation
Making these no bake chocolate mousse bars requires some essential tools that will help streamline the process. Having the right equipment makes it easier to achieve that perfect texture and presentation.
Essential Tools and Equipment
- Food processor
- Electric mixer
- Medium-sized heatproof bowl
- Small saucepan
- 9 by 13 inch baking pan
- Parchment paper
Importance of Each Tool
- Food processor: Perfect for crushing Oreos and nuts quickly, saving you time.
- Electric mixer: Ensures that your cream is whipped to perfection, helping you achieve those stiff peaks easily.
- Baking pan: A 9 by 13 inch pan is ideal for setting your mousse bars evenly.
Ingredients
These no bake chocolate mousse bars are made with a buttery Oreo crust, creamy chocolate mousse filling, and homemade whipped cream.
For the Crust
- 1 ounce raw, toasted almonds (optional) (about 3 tablespoons)
- 9.5 ounces Oreos (crushed) (about 270 grams)
- 6 tablespoons unsalted butter (melted)
For the Mousse Filling
- 1 pound semi-sweet chocolate (chopped) (16 ounces)
- 3 cups heavy cream (cold, divided)
- 2 ¾ teaspoons vanilla extract
- ½ teaspoon almond extract (substitute with additional vanilla extract)
- ¼ teaspoon salt
For the Whipped Cream Topping
- 13 ounces heavy cream (cold)
- 3 tablespoons powdered sugar
- 1 teaspoon vanilla extract
- pinch of salt
Optional Garnish
- Oreos (chopped)
- Raw almonds (chopped)
How to Make No Bake Chocolate Mousse Bars
Step 1: Prepare the Baking Pan
Line a 9 by 13 inch baking pan with parchment paper, leaving a 2-inch overhang on the two longer sides.
Step 2: Make the Crust
- In a food processor, pulse the almonds until finely chopped.
- Add the crushed Oreos and pulse until combined into crumbs.
- Transfer the mixture to a medium-sized bowl and stir in melted butter until all crumbs are coated.
- Press the mixture firmly into the bottom of the prepared pan and place it in the freezer.
Step 3: Melt the Chocolate
- Place chopped chocolate in a medium-sized heatproof bowl.
- In a small saucepan, heat 1 cup of heavy cream with salt until very hot but not boiling.
- Pour hot cream over the chocolate and let it sit for about 2 minutes before stirring until smooth.
- Add vanilla extract and allow to cool completely.
Step 4: Whip Heavy Cream
- Once cooled, pour 2 cups of cold heavy cream into an electric mixer fitted with a whisk attachment.
- Whip until stiff peaks form, then gently fold in cooled chocolate mixture until combined.
- Pour this mousse mixture over the chilled crust, spreading evenly with an offset spatula.
Step 5: Make Whipped Cream Topping
- In another bowl using an electric mixer or handheld mixer, combine remaining heavy cream, powdered sugar, vanilla extract, and pinch of salt.
- Beat on low speed for about 40 seconds; then increase to medium speed until stiff peaks form.
- Spoon whipped cream over mousse layer and spread evenly.
Step 6: Chill & Serve
Top with chopped Oreos and almonds if desired. Cover with plastic wrap and refrigerate for at least 3 hours or overnight until set. Slice with a sharp knife before serving.
Store leftover chocolate mousse bars in an airtight container in the refrigerator for up to four days. Enjoy your decadent No Bake Chocolate Mousse Bars!
How to Serve No Bake Chocolate Mousse Bars
Serving No Bake Chocolate Mousse Bars is a delightful experience that can be customized for any occasion. Here are some creative suggestions to elevate your dessert presentation.
Simple Plating
- Serve the bars directly from the pan for a casual gathering.
- Use a sharp knife to slice into squares before plating for easy serving.
Garnish with Whipped Cream
- Top each bar with a dollop of whipped cream for added richness.
- Sprinkle cocoa powder or chocolate shavings on top for a sophisticated touch.
Add Fresh Berries
- Pair with fresh raspberries or strawberries on the side for a fruity contrast.
- Create a berry compote to drizzle over each bar for extra flavor.
Chocolate Sauce Drizzle
- Warm chocolate sauce can be drizzled over the mousse bars before serving.
- It adds an extra layer of chocolate indulgence.
Serve with Ice Cream
- A scoop of vanilla or coffee ice cream complements the mousse nicely.
- This combination creates a delightful texture contrast.

How to Perfect No Bake Chocolate Mousse Bars
To achieve the best results with your No Bake Chocolate Mousse Bars, consider these helpful tips.
- Use Quality Chocolate: The flavor of your mousse relies heavily on the quality of chocolate used. Choose semi-sweet or dark chocolate with at least 60% cocoa.
- Chill Your Mixing Bowls: For a fluffier whipped cream, chill your mixing bowls and beaters in the fridge before whipping the cream. This helps it whip up faster and hold its shape better.
- Don’t Rush Cooling: Allow the melted chocolate mixture to cool completely before adding it to whipped cream. This prevents the cream from melting and ensures a light texture.
- Pack Crust Firmly: When pressing the Oreo crust into the pan, make sure to pack it tightly. A well-packed crust provides stability for your mousse bars.
Best Side Dishes for No Bake Chocolate Mousse Bars
Pairing side dishes with No Bake Chocolate Mousse Bars can enhance your dessert spread. Here are some perfect companions:
- Fresh Fruit Salad: A mix of seasonal fruits adds freshness and balances the richness of the bars.
- Chocolate-Covered Strawberries: These treats echo the chocolate theme and make for an elegant presentation.
- Coffee or Espresso: A cup of coffee pairs perfectly with chocolate desserts, enhancing their flavors.
- Cheese Plate: Include soft cheeses like brie or mascarpone, which contrast beautifully with sweet desserts.
- Mini Pastries: Offer small pastries like eclairs or cream puffs as an additional sweet option.
- Nut Mix: A bowl of mixed nuts provides a crunchy texture that contrasts well with smooth mousse bars.
Common Mistakes to Avoid
Making No Bake Chocolate Mousse Bars can be a delightful experience, but avoiding common mistakes is essential for a successful outcome.
- Skipping the chilling time: Not allowing the mousse to set properly can result in a soft texture. Always refrigerate for at least 3 hours or overnight.
- Incorrect crust packing: Failing to pack the Oreo crust tightly may cause it to crumble. Press down firmly to create a solid base.
- Overheating the cream: Heating the cream too much can lead to separation. Heat until hot, but do not boil.
- Not folding gently: When combining whipped cream with chocolate, avoid vigorous stirring. Gently fold to maintain the light, airy texture.
- Using warm ingredients: Incorporating warm chocolate into cold heavy cream can prevent proper whipping. Ensure chocolate has cooled completely before mixing.
Storage & Reheating Instructions
Refrigerator Storage
- Store in an airtight container for up to 4 days.
- Keep covered with plastic wrap if not using a container.
Freezing No Bake Chocolate Mousse Bars
- Wrap individual bars in plastic wrap and place them in a freezer-safe container.
- They can be frozen for up to 2 months without losing quality.
Reheating No Bake Chocolate Mousse Bars
- Oven: Preheat to 350°F (175°C) and warm bars for about 10 minutes. This isn’t typically necessary, as they are best served chilled.
- Microwave: Heat on low power in short intervals of 10-15 seconds until slightly softened, if desired.
- Stovetop: Use a double boiler method for gentle warming if you prefer them at room temperature.
Frequently Asked Questions
Here are some common questions about making No Bake Chocolate Mousse Bars.
What type of chocolate should I use?
For the best flavor, semi-sweet chocolate is recommended. Dark chocolate also works well for a richer taste.
Can I substitute the Oreos?
Yes! You can use any chocolate sandwich cookie or even graham crackers for a different flavor profile.
How do I make this recipe gluten-free?
To make gluten-free no bake chocolate mousse bars, use gluten-free cookies instead of regular Oreos.
How long will these bars last in the fridge?
These delicious bars will stay fresh in the refrigerator for up to 4 days when stored properly.
Can I add other flavors?
Absolutely! Consider adding peppermint extract or coffee powder for unique variations of your No Bake Chocolate Mousse Bars.
Final Thoughts
These No Bake Chocolate Mousse Bars are not only simple to prepare but also versatile enough to adapt with various flavors and toppings. Whether you’re serving them at a party or enjoying them as an indulgent treat at home, these mousse bars are sure to impress. Don’t hesitate to customize with nuts, fruits, or even different types of chocolate!
No Bake Chocolate Mousse Bars
- Total Time: 0 hours
- Yield: Approximately 12 servings 1x
Description
Indulge in these No Bake Chocolate Mousse Bars, a decadent dessert that combines a rich and creamy chocolate mousse filling with a buttery Oreo crust. Perfect for any occasion, these bars are impressively easy to prepare and can be made ahead of time, allowing you to savor their delightful flavor without the hassle of baking. Whether you’re hosting a party or simply treating yourself, these bars will satisfy your chocolate cravings with every bite.
Ingredients
- 9.5 ounces Oreos (crushed)
- 6 tablespoons unsalted butter (melted)
- 1 pound semi-sweet chocolate (chopped)
- 5 cups heavy cream (divided)
- 2 ¾ teaspoons vanilla extract
- Pinch of salt
Instructions
- Line a 9 by 13 inch baking pan with parchment paper.
- In a food processor, crush Oreos and optional almonds. Mix with melted butter and press into the bottom of the prepared pan. Freeze until firm.
- Melt chopped chocolate with heated heavy cream until smooth. Let it cool completely.
- Whip 2 cups of cold heavy cream until stiff peaks form, then gently fold in the cooled chocolate mixture.
- Pour mousse over the crust, spreading evenly, then whip remaining cream with sugar and vanilla until stiff peaks form. Spread over the mousse layer.
- Chill in the refrigerator for at least 3 hours or overnight before slicing and serving.
- Prep Time: 30 minutes
- Cook Time: None
- Category: Dessert
- Method: No Bake
- Cuisine: American
Nutrition
- Serving Size: 1 serving
- Calories: 358
- Sugar: 22g
- Sodium: 135mg
- Fat: 27g
- Saturated Fat: 16g
- Unsaturated Fat: 10g
- Trans Fat: 0g
- Carbohydrates: 28g
- Fiber: 1g
- Protein: 4g
- Cholesterol: 64mg

Leave a Comment